When managing a Kubernetes environment – whether on AWS, another cloud provider, or on-premises – securely handling secrets is a top priority. Many developers rely on methods like storing secrets in .env files or as environment variables within Kubernetes, but these approaches come with security risks and operational challenges. Sensitive information like API keys, passwords, and access tokens must be stored and accessed securely, separate from your code and configuration files.
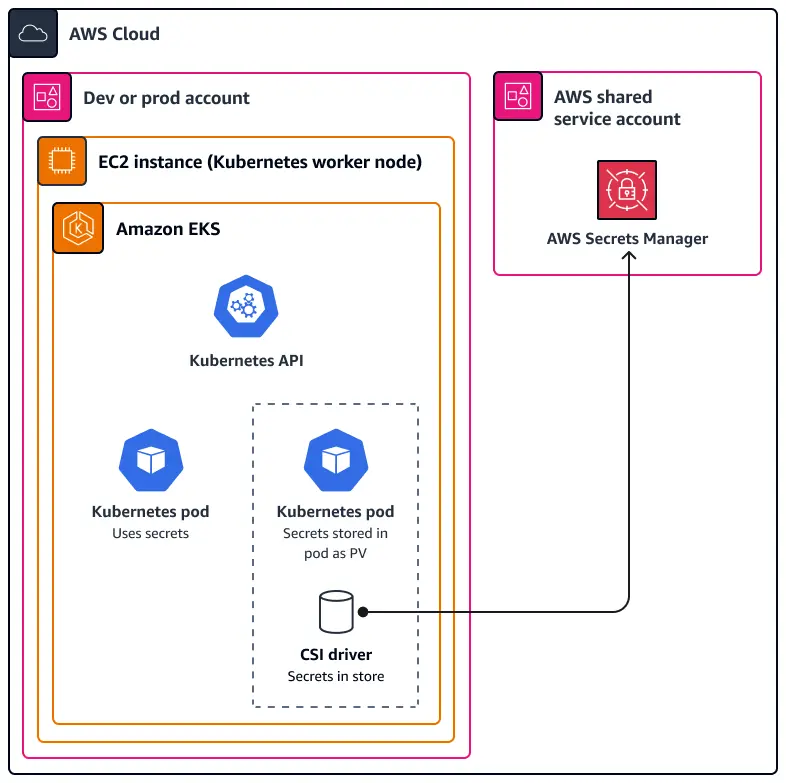
That’s where AWS Secrets Manager comes in. By integrating it with your Kubernetes cluster, you can securely store, manage, and retrieve secrets without the risk of exposing them. It’s a game changer for improving security and simplifying secret management at scale. Whether you’re using Kubernetes on AWS, DigitalOcean, or even an on-prem deployment, integrating AWS Secrets Manager should be part of your best practices.
In this post, we’ll walk through how to integrate AWS Secrets Manager with Kubernetes (specifically AWS EKS), set up IAM roles, and securely inject secrets into your workloads. For Kubernetes clusters hosted elsewhere, like on-prem or on different cloud providers, you can use the External Secrets Operator to achieve the same level of secure integration.
AWS Secrets Manager provides a centralised and secure way to manage secrets while allowing dynamic updates without modifying Kubernetes configurations.
Why Use AWS Secrets Manager Over .env Files or EKS Environment Variables?
Enhanced Security:
- .env files can be accidentally committed to source control.
- Kubernetes environment variables may expose secrets if improperly configured.
- AWS Secrets Manager encrypts secrets at rest and in transit.
Automatic Secret Rotation:
- AWS Secrets Manager supports automatic secret rotation, reducing manual effort and risk.
Fine-Grained Access Control:
- Using AWS IAM policies, you can restrict access to secrets based on roles and permissions.
Seamless Integration with AWS Services:
- AWS Secrets Manager integrates easily with AWS Lambda, RDS, and other services, ensuring better interoperability.
Automatic Syncing with Kubernetes:
- Instead of manually updating Kubernetes secrets, AWS Secrets Manager allows automatic synchronization with Kubernetes secrets.
Prerequisites:
Before proceeding with the integration, ensure you have the following:
- AWS CLI was installed and CLI keys were configured with the necessary IAM permissions.
- A running Kubernetes cluster with kubectl configured.
- Helm installed to manage Kubernetes packages.
- OIDC Provider configured for your Kubernetes cluster.
Step-by-Step Integration of AWS Secrets Manager with Kubernetes
Step 1: Install and Configure AWS CLI
Ensure that AWS CLI is installed and configured on your system.
aws configureYou will be prompted to enter your AWS Access Key, Secret Access Key, region, and output format.
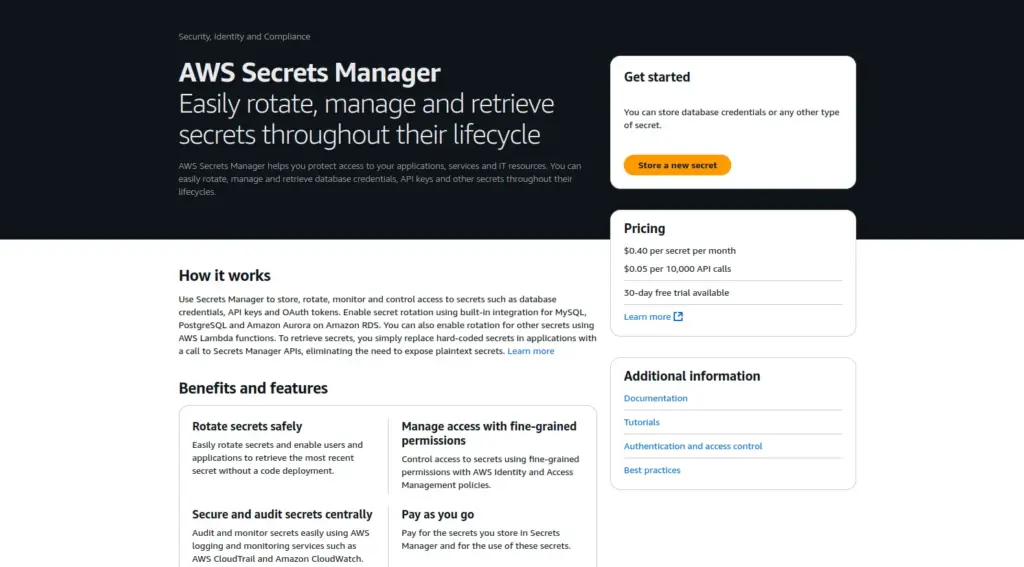
Step 2: Create a Secret in AWS Secrets Manager
To create a secret (console)
- Open the Secrets Manager console at https://console.aws.amazon.com/secretsmanager/
- Choose Store a new secret.
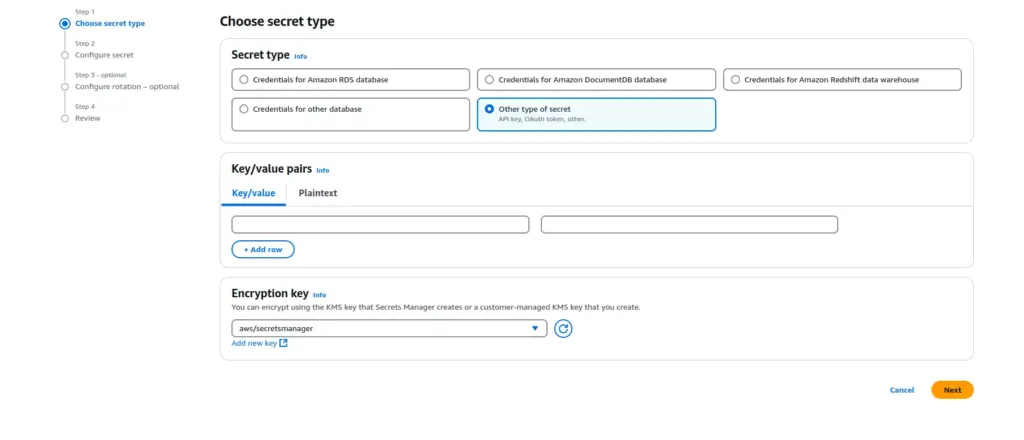
- On the Choose Secret type page, choose Other type of secret
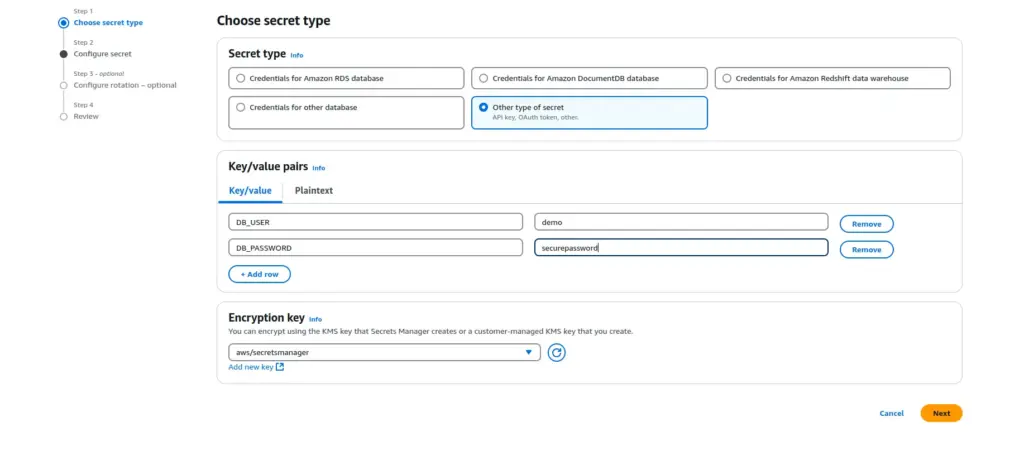
- In Key/value pairs, either enter your secret in JSON Key/value pairs or choose the Plaintext tab and enter the secret in any format. You can store up to 65536 bytes in the secret. Some examples:
- Choose Next.
- On the Configure secret page, Enter a descriptive Secret name and Description. Secret names can contain 1-512 alphanumeric and /_+=.@- characters.
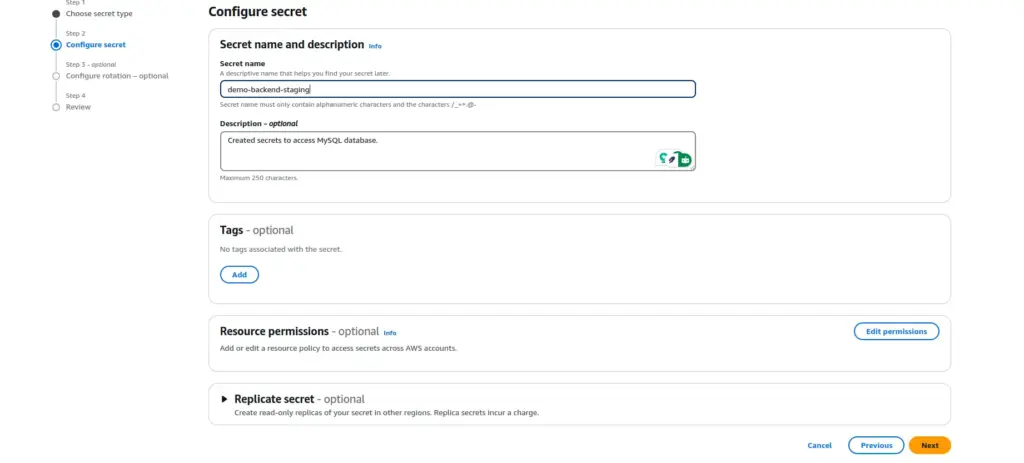
- Choose Next.
- (Optional) On the Configure rotation page, Choose Next.
- On the Review page, review your secret details, and then choose Store.
AWS CLI
Run the following command to create a secret in AWS Secrets Manager:
aws secretsmanager create-secret \
  --name demo-backend-staging \
  --secret-string '{"DB_USER":"demo","DB_PASSWORD":"securepassword"}'
Step 3: Create an IAM Policy for Secret Access
Create an IAM policy allowing read access to specific secrets in AWS Secrets Manager.
To Create an IAM Policy ( console )
- Sign in to the AWS Management Console and open the IAM console at https://console.aws.amazon.com/iam/.
- In the navigation pane on the left, choose Policies.
- Choose Create policy.
- In the Policy Editor section, choose the JSON option.
- Type or paste a JSON policy document. The following are examples of IAM policies that you can create to grant or restrict access to a secret.
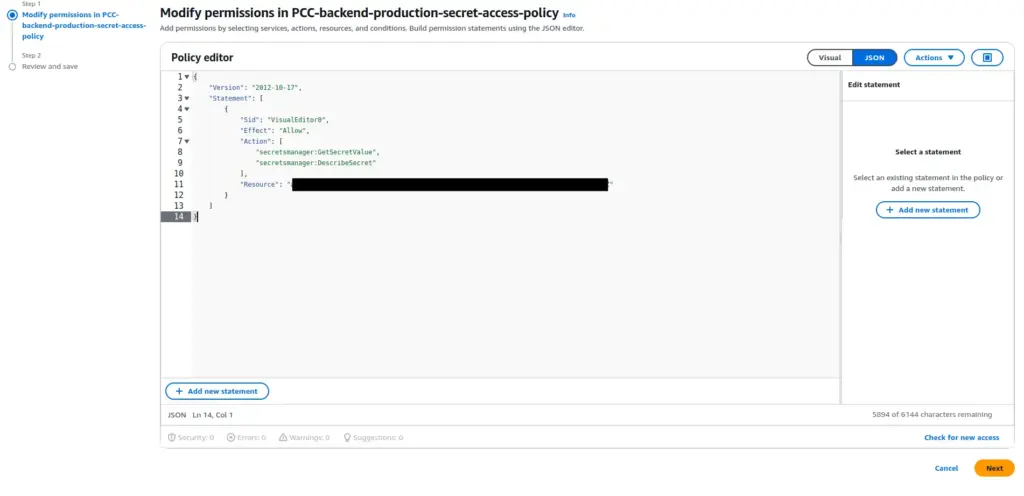
Note: In the Resources section of your IAM policy, replace it with your actual secret ARN. ensure you use the correct AWS Secrets Manager ARN for your secret. You can find the ARN in the AWS Secrets Manager console under Secret details.
- Resolve any security warnings, errors, or general warnings generated during policy validation, and then choose Next.
- On the Review and Create page, type a Policy Name and a Description (optional) for the policy that you are creating. Review the Permissions defined in this policy to see the permissions granted by your policy.
- Choose Create Policy to save your new policy.
AWS CLI
Run the create-policy command to create the policy:
aws iam create-policy \
  --policy-name SecretsManagerReadPolicy \
  --policy-document '{
    "Version": "2012-10-17",
    "Statement": [
      {
        "Effect": "Allow",
        "Action": [
          "secretsmanager:GetSecretValue"
          "secretsmanager:DescribeSecret"
        ],
        "Resource": "arn:aws:secretsmanager:<REGION>:<ACCOUNT_ID>:secret:<SECRET_NAME>"
      }
    ]
  }'
NOTE: replace REGION with your AWS Region, ACCOUNT-ID with your AWS account ID, and SECRET_NAME with your Secrets Manager secret’s name.
Step 4: Create an IAM Role with the Policy Attached
- Sign in to the AWS Management Console and open the IAM console at https://console.aws.amazon.com/iam/.
- In the navigation pane of the IAM console, choose Roles, and then choose Create Role.
- Choose Web identity as the trusted entity type and select Next.
- For the Identity provider, choose the oidc identity provider that was created for the Kubernetes Cluster.
- For the Audience, choose
sts.amazonaws.com
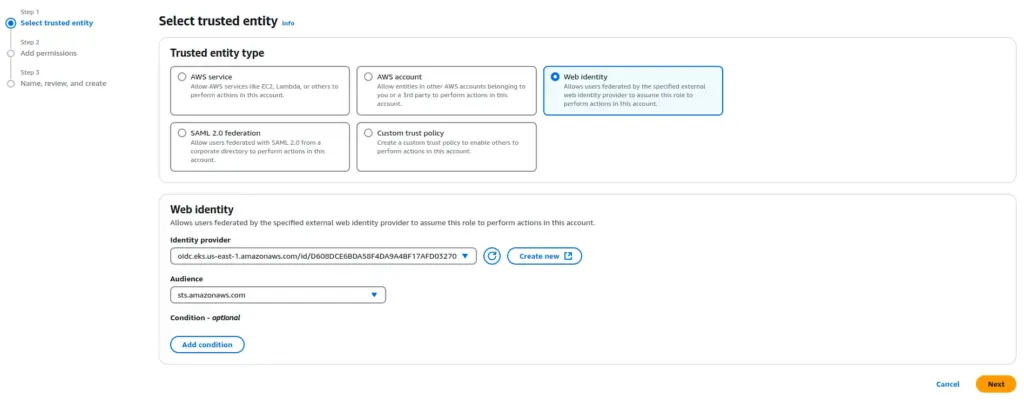
- Choose Next.
- For Permissions policies, IAM includes a list of the AWS-managed and customer-managed policies in your account. Select customer-managed policies and Attach the previously created policy.
- Choose Next.
- For Role name, enter a role name. Role names must be unique within your AWS account.
- (Optional) For Description, enter a description for the new role.
- Review the role, and then choose Create role.
- After creating the role, update the Trust Relationships:
- Change
audtosub. - Update
sts.amazonaws.comtosystem:serviceaccount:<clustername>:<serviceaccountname>.
- Change
Replace <clustername> and <serviceaccountname> with your actual Kubernetes cluster name and service account name( The service account will be created in Step 5). This ensures that the IAM role is properly mapped to your Kubernetes service account for authentication
AWS CLI
Run the create-role command to create the role:
aws iam create-role \
  --role-name SecretsAccessRole \
  --assume-role-policy-document '{
    "Version": "2012-10-17",
    "Statement": {
      "Effect": "Allow",
      "Principal": {
        "Federated": "arn:aws:iam::<account-id>:oidc-provider/<oidc-provider-url>"
      },
      "Action": "sts:AssumeRoleWithWebIdentity",
      "Condition": {
        "StringEquals": {
          "<oidc-provider-url>:sub": "system:serviceaccount:<clustername>:<serviceaccountname>"
        }
      }
    }
  }'
NOTE: Replace <account-id> with your AWS account ID, <oidc-provider-url> with your oidc identity provider that was created for the Kubernetes Cluster, <serviceaccountname> with your actual Kubernetes cluster name and with your service account name. ( The service account will be created in Step 5)
Run the attach-role-policy command to attach the previously created policy to the role:
aws iam attach-role-policy \
  --role-name SecretsAccessRole \
  --policy-arn arn:aws:iam::<account-id>:policy/SecretsManagerReadPolicy
NOTE: Replace <account-id> with your AWS account ID.
Step 5: Associate an IAM Role with a Kubernetes Service Account
Create a demo-backend-serviceaccount.yaml file to define a Kubernetes ServiceAccount with an annotation pointing to the IAM role created earlier.
apiVersion: v1
kind: ServiceAccount
metadata:
  name: demo-backend-service-account
  namespace: demo-backend
  annotations:
    eks.amazonaws.com/role-arn: <secret-access-role>
NOTE: Replace <secret-access-role> with the actual IAM role ARN created in Step 4.
Apply the manifest:
kubectl apply -f demo-backend-serviceaccount.yamlStep 6: Install the Secrets Store CSI Driver and AWS Provider
Add the Helm repository and install the Secrets Store CSI Driver using Helm and enable Kubernetes secret syncing
helm repo add secrets-store-csi-driver https://kubernetes-sigs.github.io/secrets-store-csi-driver/charts
helm repo update
helm install csi-secrets-store secrets-store-csi-driver/secrets-store-csi-driver --namespace demo-backend --set syncSecret.enabled=true --set enableSecretRotation=true --set rotationPollInterval="2m"
Install the AWS provider for the CSI Driver:
kubectl apply -f https://raw.githubusercontent.com/aws/secrets-store-csi-driver-provider-aws/main/deployment/aws-provider-installer.yamlWhy These Settings?
syncSecret.enabled=true? Setting syncSecret.enabled=true ensures that secrets from AWS Secrets Manager are automatically synchronized to Kubernetes as native Kubernetes Secrets.
enableSecretRotation=true? Setting enableSecretRotation=true Enables automatic secret rotation, meaning when the secret is updated in AWS Secrets Manager, it will be refreshed in Kubernetes without needing manual intervention.
rotationPollInterval=”2m”? Setting rota tionPollInterval=”2m” defines the interval at which Kubernetes checks for updated secrets in AWS Secrets Manager. With this setting, Kubernetes will poll for secret updates every 2 minutes, ensuring applications always have the latest credentials.
Step 7: Create the SecretProviderClass
Create a demo-backend-SecretProviderClass.yaml file to define how the secret is retrieved from AWS Secrets Manager and exposed to Kubernetes.
apiVersion: secrets-store.csi.x-k8s.io/v1
kind: SecretProviderClass
metadata:
  name: demo-backend-secrets
  namespace: demo-backend
spec:
  provider: aws
  parameters:
    objects: |
      - objectName: <SECRET_NAME_ARN>
        objectType: "secretsmanager"
        versionStage: "AWSCURRENT"
        jmesPath:
          - path: "DB_USER"
            objectAlias: "DB_USER"
          - path: "DB_PASSWORD"
            objectAlias: "DB_PASSWORD"
secretObjects:
    - secretName: demo-backend-secrets
      type: Opaque
      data:
        - objectName: "DB_USER"
          key: "DB_USER"
        - objectName: "DB_PASSWORD"
          key: "DB_PASSWORD"
Note: Replace <SECRET_NAME_ARN> with your actual AWS Secrets Manager ARN.
Apply the manifest:
kubectl apply -f demo-backend-SecretProviderClass.yaml
Step 8: Deploy a Kubernetes Application
Create a demo-backend-deployment.yaml file to deploy your application, mount the secrets as volumes, and expose them as environment variables.
apiVersion: apps/v1
kind: Deployment
metadata:
  name: demo-backend-deployment
  namespace: demo-backend
  labels:
    app: demo-backend
spec:
  replicas: 2
  selector:
    matchLabels:
      app: demo-backend
  strategy:
    type: RollingUpdate
    rollingUpdate:
      maxSurge: 1
      maxUnavailable: 0
  template:
    metadata:
      labels:
        app: demo-backend
    spec:
      serviceAccountName: demo-backend-service-account
      affinity:
        podAntiAffinity:
          requiredDuringSchedulingIgnoredDuringExecution:
            - labelSelector:
                matchExpressions:
                  - key: app
                    operator: In
                    values:
                      - demo-backend
              topologyKey: topology.kubernetes.io/zone
      containers:
        - name: demo-backend
          securityContext:
            allowPrivilegeEscalation: false
            runAsNonRoot: true
          image: <container-image-uri>
          imagePullPolicy: Always
          ports:
            - containerPort: 3000
              name: http
          resources:
            requests:
              cpu: "250m"
              memory: "512Mi"
            limits:
              cpu: "500m"
              memory: "1Gi"
          env:
            - name: DB_USER
              valueFrom:
                secretKeyRef:
                  name: demo-backend-secrets
                  key: DB_USER
            - name: DB_PASSWORD
              valueFrom:
                secretKeyRef:
                  name: demo-backend-secrets
                  key: DB_PASSWORD
          volumeMounts:
            - name: demo-backend-secrets
              mountPath: "/mnt/secrets-store"
              readOnly: true
      volumes:
        - name: demo-backend-secrets
          csi:
            driver: secrets-store.csi.k8s.io
            readOnly: true
            volumeAttributes:
              secretProviderClass: demo-backend-secrets
Note: Replace <container-image-uri> with your actual container image name or URI.
Apply the Deployment:
kubectl apply -f demo-backend-deployment.yamlStep 9: Verify the Secret Mounting in the Pod
After deploying the application, you need to verify that the secrets have been properly mounted as volumes and synced as Kubernetes secrets.
Check the Running Pods:
Run the following command to list the running pods in the demo-backend namespace:
kubectl get pods -n demo-backendAccess the Pod and Check Mounted Secrets:
Once you have the pod name, use the following commands to verify that the secrets are correctly mounted inside the container:
kubectl exec -it <pod-name> -- cat /mnt/secrets-store/DB_USER
kubectl exec -it <pod-name> -- cat /mnt/secrets-store/DB_PASSWORD
Expected Output: These commands should return the values stored in AWS Secrets Manager for DB_USER and DB_PASSWORD.
In conclusion, securely managing secrets in Kubernetes is crucial for maintaining the integrity and security of your applications. By integrating AWS Secrets Manager, you can simplify the process of handling sensitive data while ensuring best practices across your environment. At Server Pundits, we specialize in DevOps solutions, including setting up secure CI/CD pipelines, managing Kubernetes environments, and providing expert software development services. Whether you need help with secret management, cloud infrastructure, or building scalable, automated workflows, our team is here to assist you every step of the way. Let us help you streamline your operations and enhance the security of your systems.
